Monday, July 31, 2006

Blame the DYEPOT (and the SPINNING WHEEL)

Wow...I can't believe it's been two weeks since I last posted! But...I sustained this hideous spinning injury and lost way too many days, which REALLY was a PITA. You can see the cause of the injury in my shop blog here. In a nutshell, I spun for way too long without proper breaks and stretching, which caused muscle spasms that were unbelievably painful. No sleep-crying-totally-pissed-off kinda pain. Of course, it really set in bad on the weekend but on Monday of last week, I went to the doc and with anti-imflammatory and muscle relaxing meds, I'm back to normal (yeah, yeah...I know...normal for me!) So please learn from me ~ I wouldn't wish that on anyone! Take my advice and if you have access to a copy of In Sheep's Clothing, read the section in the back about proper stretches :) I haven't spun on the wheel since then and totally crashed in the last stage of my Tour de Fleece challenge. Talk about a lesson!

I'm blaming the siren call of the dyepot for neglecting my housework for yet another day. I get to blame the dentist for it today...UGH. I'd rather do housework!

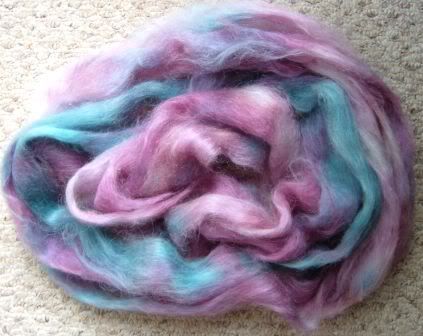
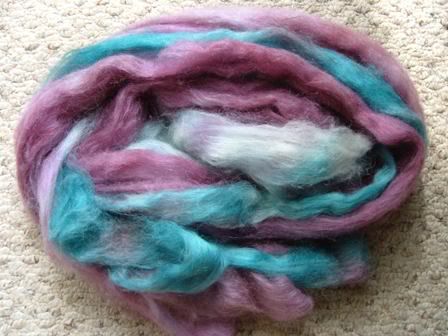
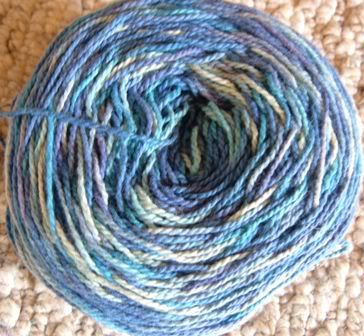
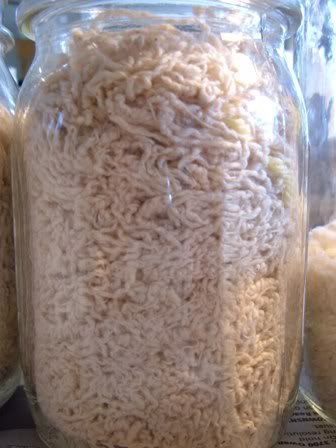
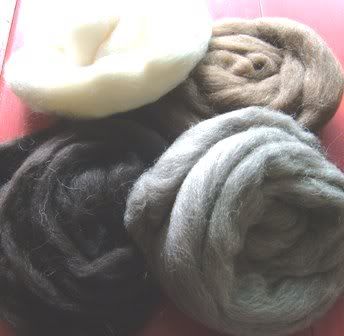
I finally experimented with the Low Immersion Dyeing process with wool. Very different than what I did with the Low Immersion Cotton Dyeing I posted awhile back. I think my first attempts were pretty successful (see pic above!) and I'll do it again and hopefully, with some tweaking, I'll get even better results.

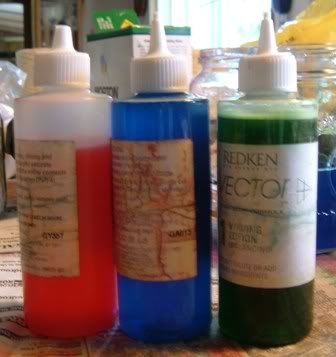
I started out a very teeny ball of super soft wool/mohair that was just sitting in a bowl on the kitchen counter. In a weird kind of frenzy, I just grabbed it, grabbed some jars and some left over dyes that were hanging out in the fridge, a gallon of vinegar (which I used UP yesterday!), and went for it. I didn't wet the fiber at all, I used it dry in all the examples I worked up. Then I grabbed another counter-sitting ball of 100% mohair and did another little sample...then grabbed the FIVE POUND bag of mohair and went nuts:)

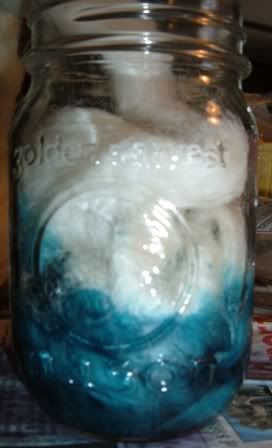
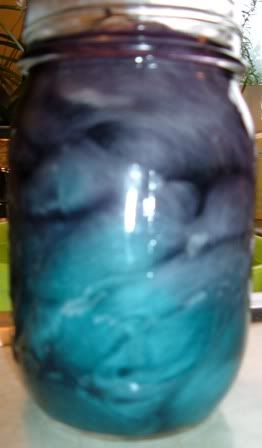
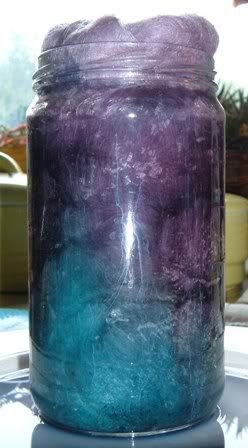
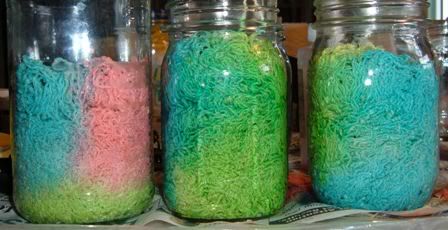
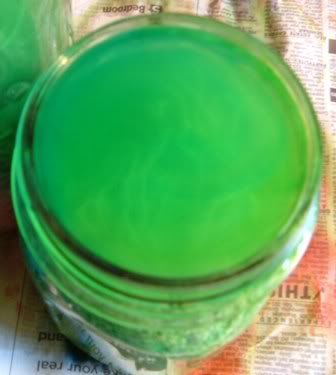
These jars were the first sample (wool/mohair). First, I mixed dye stock with vinegar and hot hot tap water, poured into the bottom of the jar, STUFFED in the dry fiber, then poured another hot dye mix on top, just covering the fiber. There really was very little liquid floating in the jar and the dry fiber sucked up a lot. I put the jar on a plate and heated it in the microwave (uncovered). The first stage of heat was 2 minutes, then I would let it rest a bit and keep heating in increments of about 1 min 30 seconds, but found that you really have to watch the jar because it WILL boil! The fiber will expand in the jar too (no matter what) and you'll get some dye overflow onto the plate, which is kind of OK because you can easily see if it's exhausting or not. Here's what it'll look like after heating:

The purple dye I was using was RIT and what made me pretty happy was that it REALLY exhausted using this method, and when I rinsed this fiber, there was zero bleeding in the rinse water. I'm sure the fact that it was mohair contributed.

The one thing I didn't do that I did in my next example was to fold the roving over several times before stuffing it in the jar. For the one above, I started stuffing one end in first and what happened was that the roving didn't have any repeats of color. One end was teal, the other end aubergine. There was some variation but not enough.
>
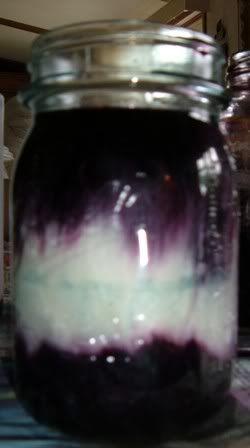
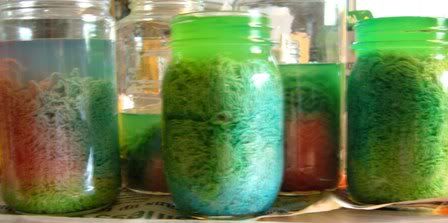
Next, I basically did the same thing, but folded the roving several times before stuffing and then did a side pour. This one turned out the best, resulting in more color repeats. (The finished roving is the one in the pic at the top of this post). The second jar above was an experiment which KIND of worked out. I poured dye in the bottom, stuffed roving, then poured more on top and left white space in the middle. This gave a nicely variegated roving. There wasn't as much white space after heating as I expected, but lots of variation in depth of color.

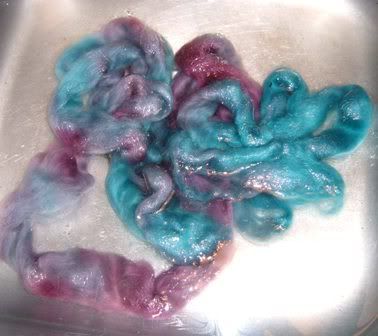
This roving was the first one, no folding of the roving...stuffing "end to end" and pouring dye first into the bottom, then pouring another color on top. Pretty, but not much color repeat.

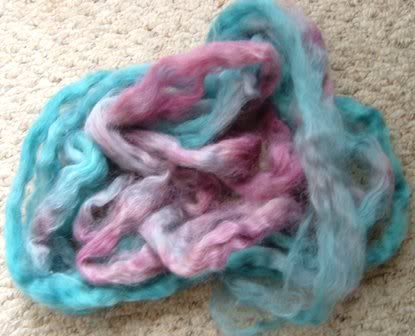
This one was done the same way as far as pouring the dye but I folded the roving several times putting both ends together then folding repeatedly. Much better variation. I used a little less dye and ended up with some white space, which I like.

This is the one where I did the folding AND poured dye down the sides of the jar and is my favorite result. Some lighter spaces, which I like, and a more color repeats than the others.

This is the roving where I left the white space in the middle. I poured dye into the bottom, stuffed, then poured more on top. It didn't leave as much white space as I expected but still is quite nice.

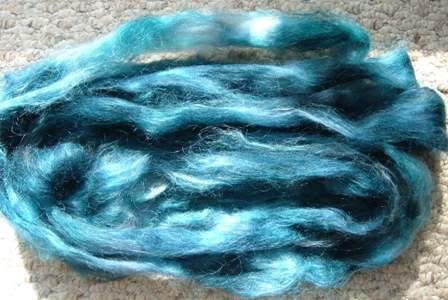
This was the only "failed" experiment of the day. I tried to just pour dye stock with no vinegar in the bottom, stuffed, poured a different color on top, then filled the jar with hot water/vinegar. Almost zero color variation and while it turned out pretty nice, the teal totally took over the aubergine. Some nice depth to the color but no distinct color separation.

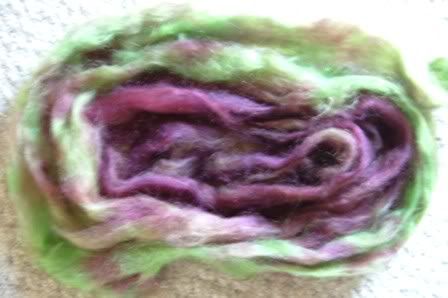
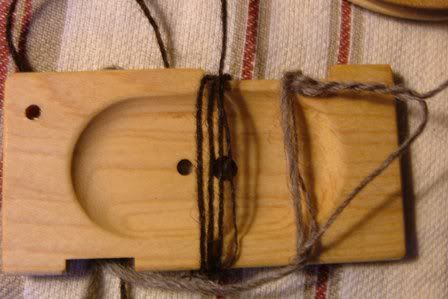
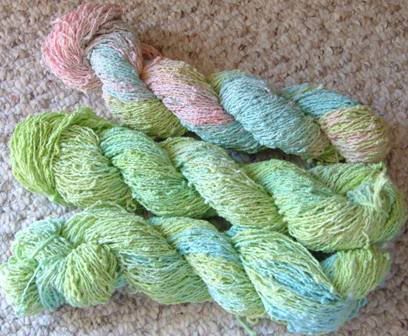
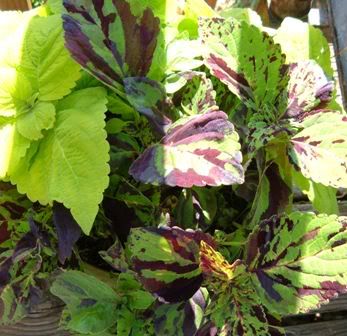
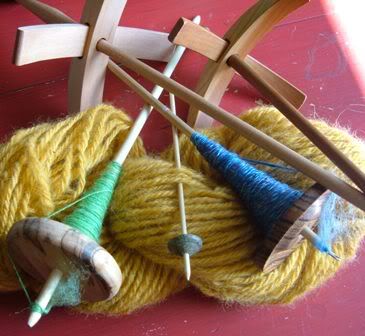
Here are some dyed fiber samples I spun & plied up last night on my lovely little Valkyrie Turkish Spindle. I love that thing! These are not the Low Immersion Dye samples. I did continue dyeing, using mostly RIT dyes because I have a bunch and well, I wanted to try something I read on a dye list. The Aubergine Mohair on the far left actually is a jar dye job...I poured RIT and vinegar dye solution onto dry roving in a jar and it came out great, with almost no excess dye in the rinse. Which, for RIT, is a bit of a miracle if you ask me! The second one from the left is a hot pour of green and aubergine (see photo below), the third from the left is actually the teal part of the wool/mohair first low immersion experiment, the Robins Egg Blue is mohair vat dyed with Procion MX and vinegar, and the last sample on the far right is hot poured RIT (wine, mauve and denim blue) I had a LOT of fiber in the pot (I put them all in dry, btw) and the dye didn't reach the bottom well before exhausting which left lots of white space. I really like this one...it's very fresh spun up:) In the hot pours, I used a LOT of vinegar in the dye bath and poured sort of cautiously because in my past experience, RIT doesn't like to exhaust. The Robin's Egg Blue exhausted very quickly (again, lots of vinegar) and I sprinkled some Raspberry Blue Lemonade Kool Aid on the top to get a bit more color variation.

Here's the RIT hot pour in green and aubergine. It blended LOTS when spun up and is very dark and mysterious:) It's the second sample from the left.

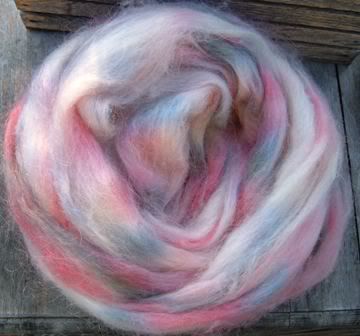
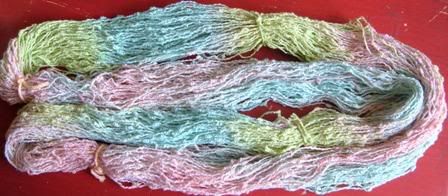
And here's the hot pour with lots of white space which I love! I actually used denim blue dye but it turned a bit lavender with the wine and mauve in the dye bath and it really blended spun up. (sample on far right in photo above).

I don't have a scale at home so can't give exact estimates of the amount of fiber in the low immersion jars. I used quart jars on the smaller bits, which were probably about 2 oz of dry fiber. The larger jars are the kind of tall, bigger jars that pasta sauce will come in and in those I could stuff approximately 4 oz or so of dry fiber. Again, these are just estimations but you'll be pretty surprized at how much fiber can go into a jar!

I also dyed some yarn with the low immersion technique but was NOT so happy with it. I'll post about that another day. So...Pros and Cons of Low Water Immersion and Wool Fiber:

Pros: Cleaner & faster than handpainting on plastic wrap. Excellent method for small amounts of fiber. No presoaking of fibers necessary. Very VERY easy to completely exhaust dyes (even RIT!) One big plus: No felting/compressing of fiber because it's handled very little (you aren't meant to poke and prod very much at all in the jar!) and the resulting dyed fiber requires VERY LITTLE rinsing. I also found that it was easier to control, in a way. I didn't get the "muddiness" that I sometimes do with handpainting. Now, I don't use thickeners when handpainting at this point in time and I believe that I sometimes use too much dye but with this method, the color separation seemed clearer and with cotton yarn, it was MUCH "cleaner" as well.

Cons: I can't imagine doing large batches of fiber this way, unless you can get your hands on HUGE jars. Hard to get lots of colors. I think in regular sized household jars (larger jars) you'd be limited to about 3 colors at best. Kind of unpredictable.

What would I do next time? Try heating the dye/water/vinegar solution to a simmer before pouring. Maybe pre-wet the fiber to see if the color travels a little better. Perhaps experiment with pouring dye into the middle somehow...trying to coil around the sides of the jar, pour, and stuff more and then pour more.

So, those are my adventures of yesterday! All of the fibers you see are available for sale on my Yarn or a Tale Shop website (I'll be putting them up there this evening after the dentist and the housework and the critter care).

And I knit, honest I do! One day soon, I'll put some knitting content up here and some more critter content (Miss Phoebe the English Angora Fiber Factory ~ with temps predicted up to 97 today and tomorrow, she'll be coming into the house for a couple of days to live)

DYE HAPPY!

Sunday, July 16, 2006

It isn't ALWAYS about the fiber.......

Photobucket

Sometimes ...well...there's THIS! And lots of other things, but tonight, I wanted to introduce you to Bubby and Mistress Bess. (That's the venerable old gal in the bottom picture)

Photobucket


What are they? Pot Bellied Kids, of course! And lest you've been under the impression that Pot Bellied Kids are CUTE, think again! *I* happen to find them adorable and charming but when experiencing them live and in full color, most folks' don't blurt out how cute they are! Now, my pots aren't paper-carrying, well groomed, show type pigs. (oh man...I must've influenced them somehow!) They're your average, everyday pot bellies with their own personalities and looks. Neither one of them have luxurious bristles, Bess is as old as the hills (EIGHTEEN!!!) and Bubby is, well....a huge fat thing in his prime. They can be snotty, demanding, and a royal PITA sometimes. But mostly they eat and sleep and wander around. Bess causes the most trouble, even in her golden years. Bubby mostly just looks like that all the time. I used to have a really cute SMALL pink and black pot named Rose but she's no longer with us. I'll have to dig up a pic and scan it. (She was pre-digital camera). SHE was really lovely, with lots of bristles and an adorable face. She was also a mean little shit! Pretty faces can hide myriad faults, my friends! I still miss her.

I've had pot bellied pigs off and on for many years, and at one time rescued them in Oklahoma. At that time, I had 30 of them at once! I could spout off for hours about how they are NOT the greatest pet on the planet, at least not for most people. (Hence the reason I had 30 living with me). And apparently, they live forever! I dearly love my two, though...I just wish they did interesting things to blog about. Once, Bubby got stuck in a dog house and we had to cut him out. That was pretty interesting.

I could take lots of photos of them laying in their houses or in the shade or in the sun. I could get MANY shots of them with gobs of wet food hanging from their adorable rooters, or pre-dinner shots when they're foaming at the mouth in anticipation. But then I'd be out of material. Ah well...I'll try to catch them doing something of interest in the future! For now, rest assured that this is what they do.......


More fibery fun tomorrow but I couldn't resist sharing one of the more bizarre aspects of my life tonight! Bon Apetit!

Wednesday, July 12, 2006

Shetland Spinning Secret Hand Shake...

Does anyone want to let me in on it? I've finished my second 4 oz bobbin for Le Tour de Fleece challenge and while my spinning isn't TOTALLY crappy, the Shetland is proving to be Not So Easy. At All. It's not going to be lace weight although there are annoying spots that are trying to be...meaning I'm ending up with thinner spots in places than I like. Not so many nubs...but this has been truly challenging to spin evenly. I'm using a "semi-woolen" method, trying to draft forward...but it's just not coming to me the way I thought it might. What the hell...it's a CHALLENGE, right?

And I *am* halfway through the pound and the fiber is simply GORGEOUS and I adore Shetland, I truly do. Maybe because I'm trying to spin much finer than I normally do, it's more challenging (ya think???) But I find myself longing for some nice springy, forgiving Jacob at the moment. I just can't seem to pick up a good rhythm with this stuff!


OK...in my own defense, the really fat parts in the photo are the ENDS of the singles. Really. But, as you can plainly see, not so even, eh? Not so lace-weight. I'll end up with fingering, I'm sure (I sure hope!) The good parts are that it's soft, and with the semi woolen a lot of glaring inconsistencies are going to blend away with plying (I'm an optimist!)

I've been thinking again about how to ply...there's a killer shawl in the new Vogue On the Go Knitting "Shawls" book and I want to make that! Not sure if that's feasible with the weight I'm going to end up with but there may still be hope! It's the same shawl that Vogue Knitting mag has as an exclusive/addition on their site....it's Shawl 18 by Meg Swanson, which is in the Fall 2005 issue. The other shawls there are quite lovely too!

(Do I REALLY love the shawl or do I love the shawl because I think I'll look like that in the shawl? Ya gotta wonder...)

I'll be swatching and trying to go for it, I think, but perhaps more research for a pattern is necessary. Will I end up with a blanket instead of this shawl with my Shetland? And...how do I ply for color? I'm thinking of plying the gray and white together for the border and the 2 browns together for the main part. Maybe a bit funky, but hey, I've always been a bit funky!

So, before work today I have to clean Frank's cage (dear old guinea pig!) and groom Phoebe (fiber factory English Angora who's a real hoot!), print some ball bands for the shop, call my doctor...when all I want to do is laze around on this gloomy, rainy morning. I love rainy days!

Monday, July 10, 2006

Results of Dyeing in a New Way

I finally took some photos of the low water immersion dyeing on cotton yarn in my last post. However, one of the results was in my shop on the counter, waiting to be balled up and knit into a sweet little store sample summery baby top. It was cotton chenille and it was REALLY lovely! Someone bought it before I could even ball it up so I'm going to have to skein up more cotton chenille and do it all over again. This time, I'll do a production line and dye up more colors:) But, I do have 3 skeins of nubby cotton that came out terrific, and one is just like the chenille, only......uh........nubby!

The top skein was the three-color jar, and the other 2 were the blue/green jars.

The colors blended just a bit, but not as much as I expected. In my experience, this method, though more unpredictable than hand-painting, is much "cleaner" when it comes to color separation on cotton. You could get more blending by leaving the dye to move longer before fixing or adding more dye for a wetter pre-fixing solution. For some reason, even when using a light touch with dyes, I get more color fusing in hand-painting cotton. I don't use a thickener, which may be part of the problem, and perhaps the way I roll up the skeins they smoosh into one another more. And I don't use heat with these dyes...I leave them for 24 hours. It also takes MUCH longer to rinse out excess dye when I hand-paint and with this method, there was almost no bleeding in the rinsing process.

If it weren't for my continuing battle with the dreaded housework, I'd be doing this again all day. But, I really need to get a handle on my housework. Not having the house organized makes me crazy and I just can't seem to focus on the "fun" work when I'm like that. My to-do list between the house, my personal life, and my shop is pretty overwhelming these days and I'm trying really hard to figure out a way to get a handle on all of it without working myself to death. If anyone has any helpful suggestions for this, I would be really happy to hear them!

It was really fun to hear all the comments on the Spindlers list about the dyeing:) I truly love that list and all the wonderful people and experience that "live" there so it feels good to give something back. I was awake a good part of the night thinking about dyeing wool this way. I have a couple of ideas, but I'm mostly concerned about the dye striking enough before you add the fixative (which, with wool, would be acid/water). I wonder if the colors will all blend together at that point, especially since heat is going to be applied afterward. I have a couple ideas in mind:

1. Try a jar with vinegar in the dye solution and one without.

2. Use HOT dye/vinegar when applying dye

3. Uh...I thought I had more ideas but I'm suddenly fresh out ;>

Anyway, I hope to be able to play around with this in the next day or two. I'm going to try roving first, I think. But everything I've learned about dyeing wool tells me it's going to be a whole 'nother animal! Stay tuned...

Wednesday, July 05, 2006

Dye in a New Way...

I'm a really intuitive dyer...I tend not to follow many rules, I play a lot, I experiment. So, when I came upon instructions for Low Water Immersion dyeing (intended for fabric) I thought..."Why not for YARN?" I played with it on some cotton with a couple of skeins and was pretty pleased. I haven't knitted any up yet...I saved out one ball to knit but sold all the others I did that day. I was concerned about pooling in the knitting, etc. Here's a look at my first attempt...

Doesn't look that awful balled up :) But I can't leave well enough alone. I wanted more colors and I wanted to do it again. Now, I'm not really that disillusioned with hand-painting but the process of this low water immersion technique is so unpredicable. It's a tad easier too.

I'm going to walk y'all through the steps of low immersion dyeing on cotton yarn...you can certainly do it with wool...and I'm dyeing to try it with wool roving myself:)

First (boring) things first: Wash your yarn in hot water with Syntrapol (I've heard Dawn is a good sub, but I'm not sure). This removes any sizing, etc and gives you a clean canvas. Rinse and spin (or wring it out--this is cotton, so wringing out is fine!) so that the yarn is damp, not wet.

You should have collected some glass jars...you want your yarn to fit in TIGHT and I do mean TIGHT. Ball the slightly damp skein up and stuff it VERY TIGHTLY into the jar. Smush it, poke it, stuff it down into the jar. Like this:

This yarn looks like brains because it's a nubby cotton...fun, eh? Wait'll you see the alien brain photo later. Anyway, you want it packed really tight. This is very important! And that the yarn is not soaking wet is important as well.

Mixing the dyes: I used Procion fiber reactive dyes from Dharma...no heat necessary. You want to mix up the dyes with PLAIN WATER ONLY. No urea, no soda ash, nada! Just dye and water at this stage. Mix them according to the directions for your particular fiber reactive dye. You can use one, two, three colors...I chose three for mine. Now for the fascinating part....

You're going to need some precision pouring the dyes into the jar onto the yarn. I found that using the hair dye squirt bottles I begged from my hair stylist worked very well. (For this purpose, I needed to cut the tips off a bit more than I would for hand-painting)

For simplicity's purpose, I'm going to describe what *I* did in pouring on the dyes. You can certainly go your own route here! I tilted the jar a bit, and started squirting the dye down one side of the jar, trying to make sure that I was saturating that side/section of yarn. You could also (and I did this on another jar) pull out your yarn and pour some dye into the bottom of the jar to color the bottom. You don't want to fill the jar at this point with dye! You want to start coloring a section. At this stage, you can "smoosh" a bit...you can press down on the yarn so that more of the dye gets to the bottom (if you chose to pour onto the yarn, instead of into the bottom of the jar). This is something I didn't understand the first time I tried this...YOU ARE NOT FILLING THE JAR! You're trying to put in enough dye to color a section of the yarn in the jar.

When you're happy with the saturation there and you don't have excess dye floating on the top, time for step 2! Grab another color and squirt/pour onto another section of the yarn. Again, go lightly and DO NOT SMOOSH at this point (or at all from now on) unless you want the colors to blend together. If the dye looks "stuck" on a section, add SMALL amounts of water until it spreads where you want it but keep in mind that you still want a basically "dry" yarn at this point. Pour...wait...pour more if you want. And then continue in this manner with all your colors. It should look something like this:

The first jar was done with 3 colors, the second two with 2 colors. Notice how there is NOT any excess liquid at the top of the yarn? Now onto the tricky part...

Waiting and watching (sigh). BUT...it's super important! This stage should take anywhere from a few minutes to an hour. If you leave it too long, your dyes are going to blend, which is fabulous if you want a more "Monet" water-color result. If you want more distinction, keep a careful eye on the jars and when it looks right to you, it's time to fix the dye. Some dyes will "split" as they creep along the fiber, which can be a Very Cool Thing. I don't find that the Procion dyes I've been using split UNLESS I mix colors to get another. I.E: Mixing blue/red to get purple can end up in green at the edges:)

When your yarn looks about like you want it to look in the end, you need to FIX THE DYE. Fiber reactive dyes require Soda Ash as a fixative (this is NOT baking soda!) Mix the soda ash into a solution and then pour the solution into the jars to just cover the yarn. What will be happening here is that your yarn will have "accepted" the dyes and is just waiting for a reason to keep them! It'll be like this:

And don't freak out if it looks like this on top:

It can be cloudy, weird, bizarre looking! That's OK, (and part of the fun!) If you look into the jars, your colors should still be separated. DO NOT SMOOSH, STIR, AGITATE OR OTHERWISE *&)@* with your jar of yarn at this point!!! I know it'll be hard to keep your paws out of it but the fixative WILL creep down into the yarn, I promise! Do not underestimate the power of gravity! LEAVE IT ALONE! For (and this sucks, I know) at least an hour!
When at least an hour has gone by (and if you can resist, or have other pressing matters to attend to) or 6 or 12, you can rinse your yarn.
I used the most excellent instructions of Paula Burch when I started doing this and you can find so much more info on this process (and many more!) from her HERE.
Tomorrow I'll post the results of my own low immersion dyed cotton yarns so you can see what you're getting into before you take the plunge:)

Inspired by a perfect summer day

Wow...woke up this morning to a gem of a forecast...Blue skies, light breeze, 75 degrees all day. It doesn't get better than this:) After I get done messing with this blog I'll mess around with the plants, kick around the idea of going to the sale at the nursery for more perennials cheap, vacuum and do laundry and clean the toilet (awwwwwwwww man!) but mostly, DYE! And when I was outside photographing some stuff for the blog, I took some pics of a couple of plants on the deck for inspiration...I get so stuck in color ruts sometimes and I'm in a green phase right now. Ha...and maybe will be still looking at these...


...but it's summer...things are green and gorgeous! And my green stuff always sells. That's a pot of coleus on the top and a pineapple mint on the bottomt. The pineapple mint is absolutely delicious in iced tea...just drop in a few branches and let it steep in the sun.

I guess I won't be working on the Tour de Fleece challenge today...too much to do and I'm feeling dangerously cocky about it since I spun up 4 oz of the pound yesterday morning.

I participated in a Spindlers list Dyeing4Spring exchange, and received this lovely yellow/green roving from Norma on the list, along with the spalted maple spindle. This fiber actually helped me figure out the long draw on a spindle...it's a dream to spin! I'm trying to find out what it is. The cool new spindle fits in quite well with my small spindle collection, which currently consists of the spalted maple, a zebrawood top whorl, a tahkli (that I'm afraid of!), an Ashford Turkish (my first!) and a Valkyrie Turkish, which I adore. Not pictured is a Very Cool Alden Amos stone whorl spindle that lives at the shop with fiber for sock yarn on it.

Spindling was my first love and I still do it regularly, much to the dismay of my Mom and assorted spinning buddies. To me, it's great fun, and very calming. It's not always about the finish line for me, I really do enjoy the whole process and spindling slows that down. And the portability can't be beat! If I only have a few minutes to spin, I love how easy it is to grab a spindle and just DO IT rather than committing to sitting down at the wheel. So much easier to collect than wheels :) I'm currently lusting after a Greensleeves McKenna and something-anything-from Bill at Copper Moose. I want a Hatchtown too, and a fancy fancy Bosworth...

So, I'm off to accomplish some of the dreaded housework, maybe hit the nursery and DEFINITELY get some dyeing done :)

Tuesday, July 04, 2006

And the race is on ~ for me, anyway :)

I started out this morning spinning the Shetland for my Tour de Fleece challenge...


Photobucket - Video and Image Hosting

And what a challenge it's turning out to be! I recently discovered how to do long draw spinning and have been having a bit of trouble with it. So the first 4 oz of this roving came hard but toward the end (like the last 1/2 oz!) I might have been getting somewhere. I was tweaking tension (scotch and drive band), playing with different whorl ratios, you name it! This roving is more like combed top and maybe Shetland isn't the easiest thing in the world to use in long draw spinning, I don't know. I'm going to google it here in a minute and see what I can come up with to share.

This blog ~ PINK TEA ~ had a pretty interesting entry about a Shetland Spinning Class. And take a gander at the Tussah Silk she spun and plied...WOW! Awesome! Anyway, she mentions spinning "semi-woolen", which is drafting forward I assume, rather than back. I ended up playing with that some myself about 2 oz into it and found it helped so maybe I'm onto something after all :) And I found that I, too, needed to really loosen up the scotch tension to get even close to enough twist.

Photobucket

I did spin up some other dark Shetland, (not as "combed top-ish) as this on the Mazurka at work and it wasn't easy either but I wasn't at all trying to draft foward. I finished it as 2-ply and it's very soft...I think it wants to be a scarf! There are about 200 yards of a fingering weight (mosttly!) Then I tried with some Coopworth which was really tacky as if it had a lot of lanolin or spinning oil in it from processing and THAT was NOT easy. I did have a very easy time with some wool roving at the shop on Mom's Ashford Elizabeth...that stuff just flew onto the bobbin like magic and the Elizabeth put lots of twist in. It was a bit of a challenge getting twist in with the Traditional today as fine as I was (trying!) to spin...I think I need the smaller bobbins...I'm using the standard right now.

So tomorrow I may try the Mazurka with another four oz...I think the ratio (which I really don't understand the way I should) might be better...loose tension, draft forward.

Now I'm eyeballing a ball of cormo roving to practice true woolen spinning...the question is...dye it before or dye it after? Hmmmm....(as the huge pile of stuff waiting to be dyed on the counter screams at me ) Add to "To-Do List" : BUY SOME ACID DYES!!! The Jacquard dyes I have are really boring colors but I think I may have to dig them out and use them up anyway. And there's always Kool Aid, and Wilton's (but I think NOT the Rit anymore...it bleeds something awful and takes a thousand and twelve rinses to get out...but sometimes it's good to add a bit of it to other dyes to tweak color)

Photobucket

This is the tacky Coopworth I tried to spin on the Traditional using the long draw but it was VERY tacky and just a PITA to spin. (and my dining room table isn't pink...its a very cool beat up barn red!) The singles weren't real even by any means, I fought it every step of the way. I ended up making a 3 ply from it, after reading in the current issue of Spin Off about plying and spinning for knitting. Sigh...I though 2 ply was grand until I read that! So I only ended up with about 240 yards or so of this. It was interesting trying to wash out the tackiness...took awhile and super hot water! I do like how the 3-ply looks though. The article said that 3 + plies fill in the knitting better than 2-ply, and that 2-ply is better suited to lacey knitting, which is a relief, because I want to make a lace shawl out of my pound of Shetland :)

I'll have to do a lot of searching for a pattern that can use all 4 colors and I've also played around with the idea of plying two different colors together...the two darker and the two lighter together and see what I get. It looks like I'll be able to spin this up in plenty of time for the challenge deadline (July 23).

I'm off to check out the other participant's blogs to see how they're coming along.

Monday, July 03, 2006

First Post and Tour de Fleece challenge

There's not much here yet, I admit but I'm very very new to this blogging thing and I've spent most of the day trying to figure out heretofore unknown things like blog skins and html code I did manage to figure out how to insert the Tour de Fleece button in my links area AND even hyperlink it, so perhaps that's enough for one day of blogging.

I've decided to just start posting and use this to begin posting my progress in the Online Spinning Challenge called
Le Tour de Fleece. I've challenged myself to spin up 1 pound of a very lovely Shetland in 4 separate colors, hoping to spin it fine enough for a lace shawl. I've spent both days of the challenge thus far finishing up various fibers on both my dear Mother's Kromski Mazurka (which I kidnapped from the shop and brought home) and my own Ashford Traditional. I recently taught myself long draw spinning and plyed some brown Shetland that I'd spun that way on the Mazurka. It came out OK, particularly for my very first attempt at long draw spinning on a wheel I'm still getting to know. I'm donating 4 oz of brown llama roving for the challenge prize pool.

But now, I have the Traditional bobbins free and all the Mazurka bobbins free and tonight or tomorrow morning I hope to start sampling a bit to see which wheel will work best.

I want this blog to be a place to share my spinning, dyeing and knitting adventures and I plan to work on a separate blog for the shop I share with my Mom, Yarn or a Tale in Millington Michigan, and another personal blog about me, my life and my critters (and I do have critters!)


I need to get busy dyeing up yarn and roving, I have LOTS of knitting to do for the shop, I have patterns to write, a newsletter to get out, a Scarf of the Month to design...and I only have 2 more days off :o

In the meantime, here's a quick example of some of the stuff I like to do for fun! These are some mohair locks I bought as raw, unwashed fleece (and THAT is a story in itself, coming soon!) and hand-dyed. They are soooo yummy (and for sale in my shop)


Dyed Mohair Locks