Dye in a New Way...
I'm a really intuitive dyer...I tend not to follow many rules, I play a lot, I experiment. So, when I came upon instructions for Low Water Immersion dyeing (intended for fabric) I thought..."Why not for YARN?" I played with it on some cotton with a couple of skeins and was pretty pleased. I haven't knitted any up yet...I saved out one ball to knit but sold all the others I did that day. I was concerned about pooling in the knitting, etc. Here's a look at my first attempt...
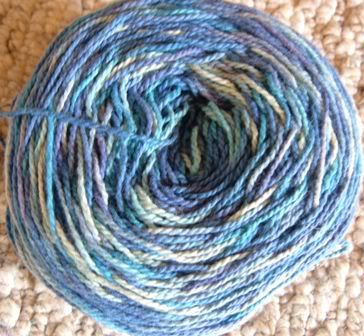
Doesn't look that awful balled up :) But I can't leave well enough alone. I wanted more colors and I wanted to do it again. Now, I'm not really that disillusioned with hand-painting but the process of this low water immersion technique is so unpredicable. It's a tad easier too.
I'm going to walk y'all through the steps of low immersion dyeing on cotton yarn...you can certainly do it with wool...and I'm dyeing to try it with wool roving myself:)
First (boring) things first: Wash your yarn in hot water with Syntrapol (I've heard Dawn is a good sub, but I'm not sure). This removes any sizing, etc and gives you a clean canvas. Rinse and spin (or wring it out--this is cotton, so wringing out is fine!) so that the yarn is damp, not wet.
You should have collected some glass jars...you want your yarn to fit in TIGHT and I do mean TIGHT. Ball the slightly damp skein up and stuff it VERY TIGHTLY into the jar. Smush it, poke it, stuff it down into the jar. Like this:
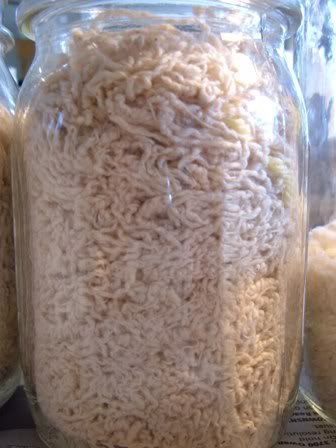
This yarn looks like brains because it's a nubby cotton...fun, eh? Wait'll you see the alien brain photo later.
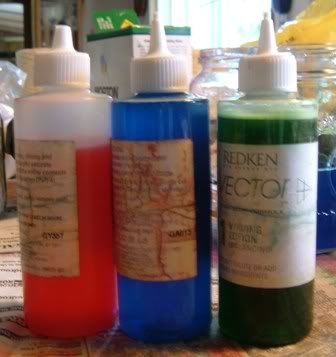
Mixing the dyes: I used Procion fiber reactive dyes from Dharma...no heat necessary. You want to mix up the dyes with PLAIN WATER ONLY. No urea, no soda ash, nada! Just dye and water at this stage. Mix them according to the directions for your particular fiber reactive dye. You can use one, two, three colors...I chose three for mine. Now for the fascinating part....
You're going to need some precision pouring the dyes into the jar onto the yarn. I found that using the hair dye squirt bottles I begged from my hair stylist worked very well. (For this purpose, I needed to cut the tips off a bit more than I would for hand-painting)
For simplicity's purpose, I'm going to describe what *I* did in pouring on the dyes. You can certainly go your own route here! I tilted the jar a bit, and started squirting the dye down one side of the jar, trying to make sure that I was saturating that side/section of yarn. You could also (and I did this on another jar) pull out your yarn and pour some dye into the bottom of the jar to color the bottom. You don't want to fill the jar at this point with dye! You want to start coloring a section. At this stage, you can "smoosh" a bit...you can press down on the yarn so that more of the dye gets to the bottom (if you chose to pour onto the yarn, instead of into the bottom of the jar). This is something I didn't understand the first time I tried this...YOU ARE NOT FILLING THE JAR! You're trying to put in enough dye to color a section of the yarn in the jar.
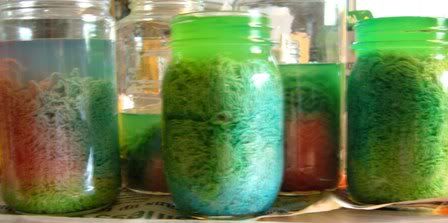
When you're happy with the saturation there and you don't have excess dye floating on the top, time for step 2! Grab another color and squirt/pour onto another section of the yarn. Again, go lightly and DO NOT SMOOSH at this point (or at all from now on) unless you want the colors to blend together. If the dye looks "stuck" on a section, add SMALL amounts of water until it spreads where you want it but keep in mind that you still want a basically "dry" yarn at this point. Pour...wait...pour more if you want. And then continue in this manner with all your colors. It should look something like this:
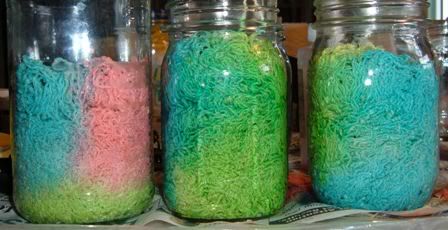
The first jar was done with 3 colors, the second two with 2 colors. Notice how there is NOT any excess liquid at the top of the yarn? Now onto the tricky part...
Waiting and watching (sigh). BUT...it's super important! This stage should take anywhere from a few minutes to an hour. If you leave it too long, your dyes are going to blend, which is fabulous if you want a more "Monet" water-color result. If you want more distinction, keep a careful eye on the jars and when it looks right to you, it's time to fix the dye. Some dyes will "split" as they creep along the fiber, which can be a Very Cool Thing. I don't find that the Procion dyes I've been using split UNLESS I mix colors to get another. I.E: Mixing blue/red to get purple can end up in green at the edges:)
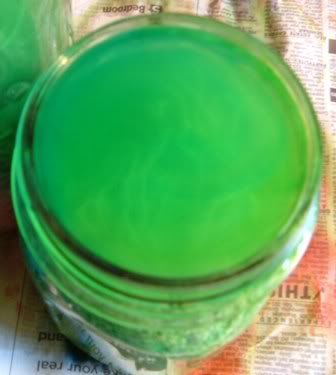
When your yarn looks about like you want it to look in the end, you need to FIX THE DYE. Fiber reactive dyes require Soda Ash as a fixative (this is NOT baking soda!) Mix the soda ash into a solution and then pour the solution into the jars to just cover the yarn. What will be happening here is that your yarn will have "accepted" the dyes and is just waiting for a reason to keep them! It'll be like this:
And don't freak out if it looks like this on top:
posted by Leah @ 7/05/2006 06:06:00 PM
![]()
![]()


<< Home